Module 1: Getting Started - Repository & Azure Setup
Clone the repository, understand the structure, and prepare your Azure environment for deployment
Module 1: Getting Started - Repository & Azure Setup
Duration: 30 minutes
Objective: Get the code, understand what you're deploying, and configure Azure credentials for deployment.
📊 About Your Progress Tracking
As you work through this training, your completion status is tracked automatically:
✅ How it works:
- Checkboxes and progress are saved in your browser’s local storage
- No login or account required
- Your progress persists across browser sessions (as long as you use the same browser)
⚠️ Important Note:
- If you clear your browser cache/cookies, your progress will be reset
- Progress is browser-specific (if you switch browsers, you’ll start fresh)
- For persistent tracking, consider bookmarking your progress or taking notes
💡 Pro Tip: If you’re working across multiple devices, keep a simple checklist in a text file or notebook!
🤖 Meet CORA: Your AI Training Partner
CORA stands for Customer-Oriented Response Agent, but more importantly, she’s the name we gave our AI training application! 🤖
Why “CORA”?
- Easy to remember (better than “Voice Agent Simulator v2.3”)
- Friendly and approachable
- Represents a person (which is what she simulates!)
- This is NOT an industry-standard acronym - it’s the unique name for this specific application
What does CORA do?
CORA is an AI-powered customer simulator that:
- Role-plays as a customer seeking help
- Tests customer service agents in training
- Adapts personality based on scenarios (happy, frustrated, confused, etc.)
- Evaluates performance with AI-powered scoring
- Provides analytics to track improvement over time
Think of CORA as: A digital customer who never gets tired of being asked the same questions, always gives constructive feedback, and never leaves a bad Yelp review. The perfect training partner! 🌟
Business Value:
- Train customer service teams safely without real customers
- Scale training without hiring actors
- Get consistent evaluation across all training sessions
- Track performance improvements with data
🗺️ What You’ll Learn in This Training
This training is organized into modules that walk you through deploying, testing, and understanding CORA:
- Module 1 (this module): Set up your development environment and Azure resources
- Module 2: Deploy CORA to Azure using Infrastructure as Code
- Module 3: Test CORA locally and understand the application architecture
- Module 4: Explore Azure services that power CORA
- Module 5: Monitor and troubleshoot your deployment
- Module 6: Customize and extend CORA for your needs
By the end, you’ll have a fully functional AI training application running in Azure, and you’ll understand how all the pieces work together!
🎯 Learning Objectives
By the end of this module, you will:
- Clone the training repository from GitHub
- Understand the repository structure (src/, infra/, docs/)
- Identify the key files needed for deployment
- Log in to Azure CLI and verify subscription access
- Locate your Azure AI Foundry project endpoint
- Prepare environment configuration for deployment
📥 Step 1: Get the Repository Code
You have three options to get the code on your local machine:
Option A: Using Git Command Line (Recommended)
Open a terminal (PowerShell, Command Prompt, or Terminal) and run:
git clone https://github.com/jbaart37/Cora-Voice-Agent-Training.git
cd Cora-Voice-Agent-Training
Why Git? You can easily pull updates if we make changes to the training materials!
Option B: Using Visual Studio Code
- Open VS Code
- Press
Ctrl+Shift+P(orCmd+Shift+Pon Mac) - Type “Git: Clone” and press Enter
- Paste the repository URL:
https://github.com/jbaart37/Cora-Voice-Agent-Training.git - Choose a local folder to clone into
- Click “Open” when prompted
📸 Screenshot placeholder: VS Code Git Clone dialog
Option C: Download as ZIP (No Git Required)
If you don’t have Git installed or prefer not to use it:
- Go to https://github.com/jbaart37/Cora-Voice-Agent-Training
- Click the green Code button
- Click Download ZIP
- Extract the ZIP file to a folder on your computer
- Open the extracted folder in VS Code or your preferred editor
Note: If you download as ZIP, you won’t be able to use Git commands, but all the code will work fine!
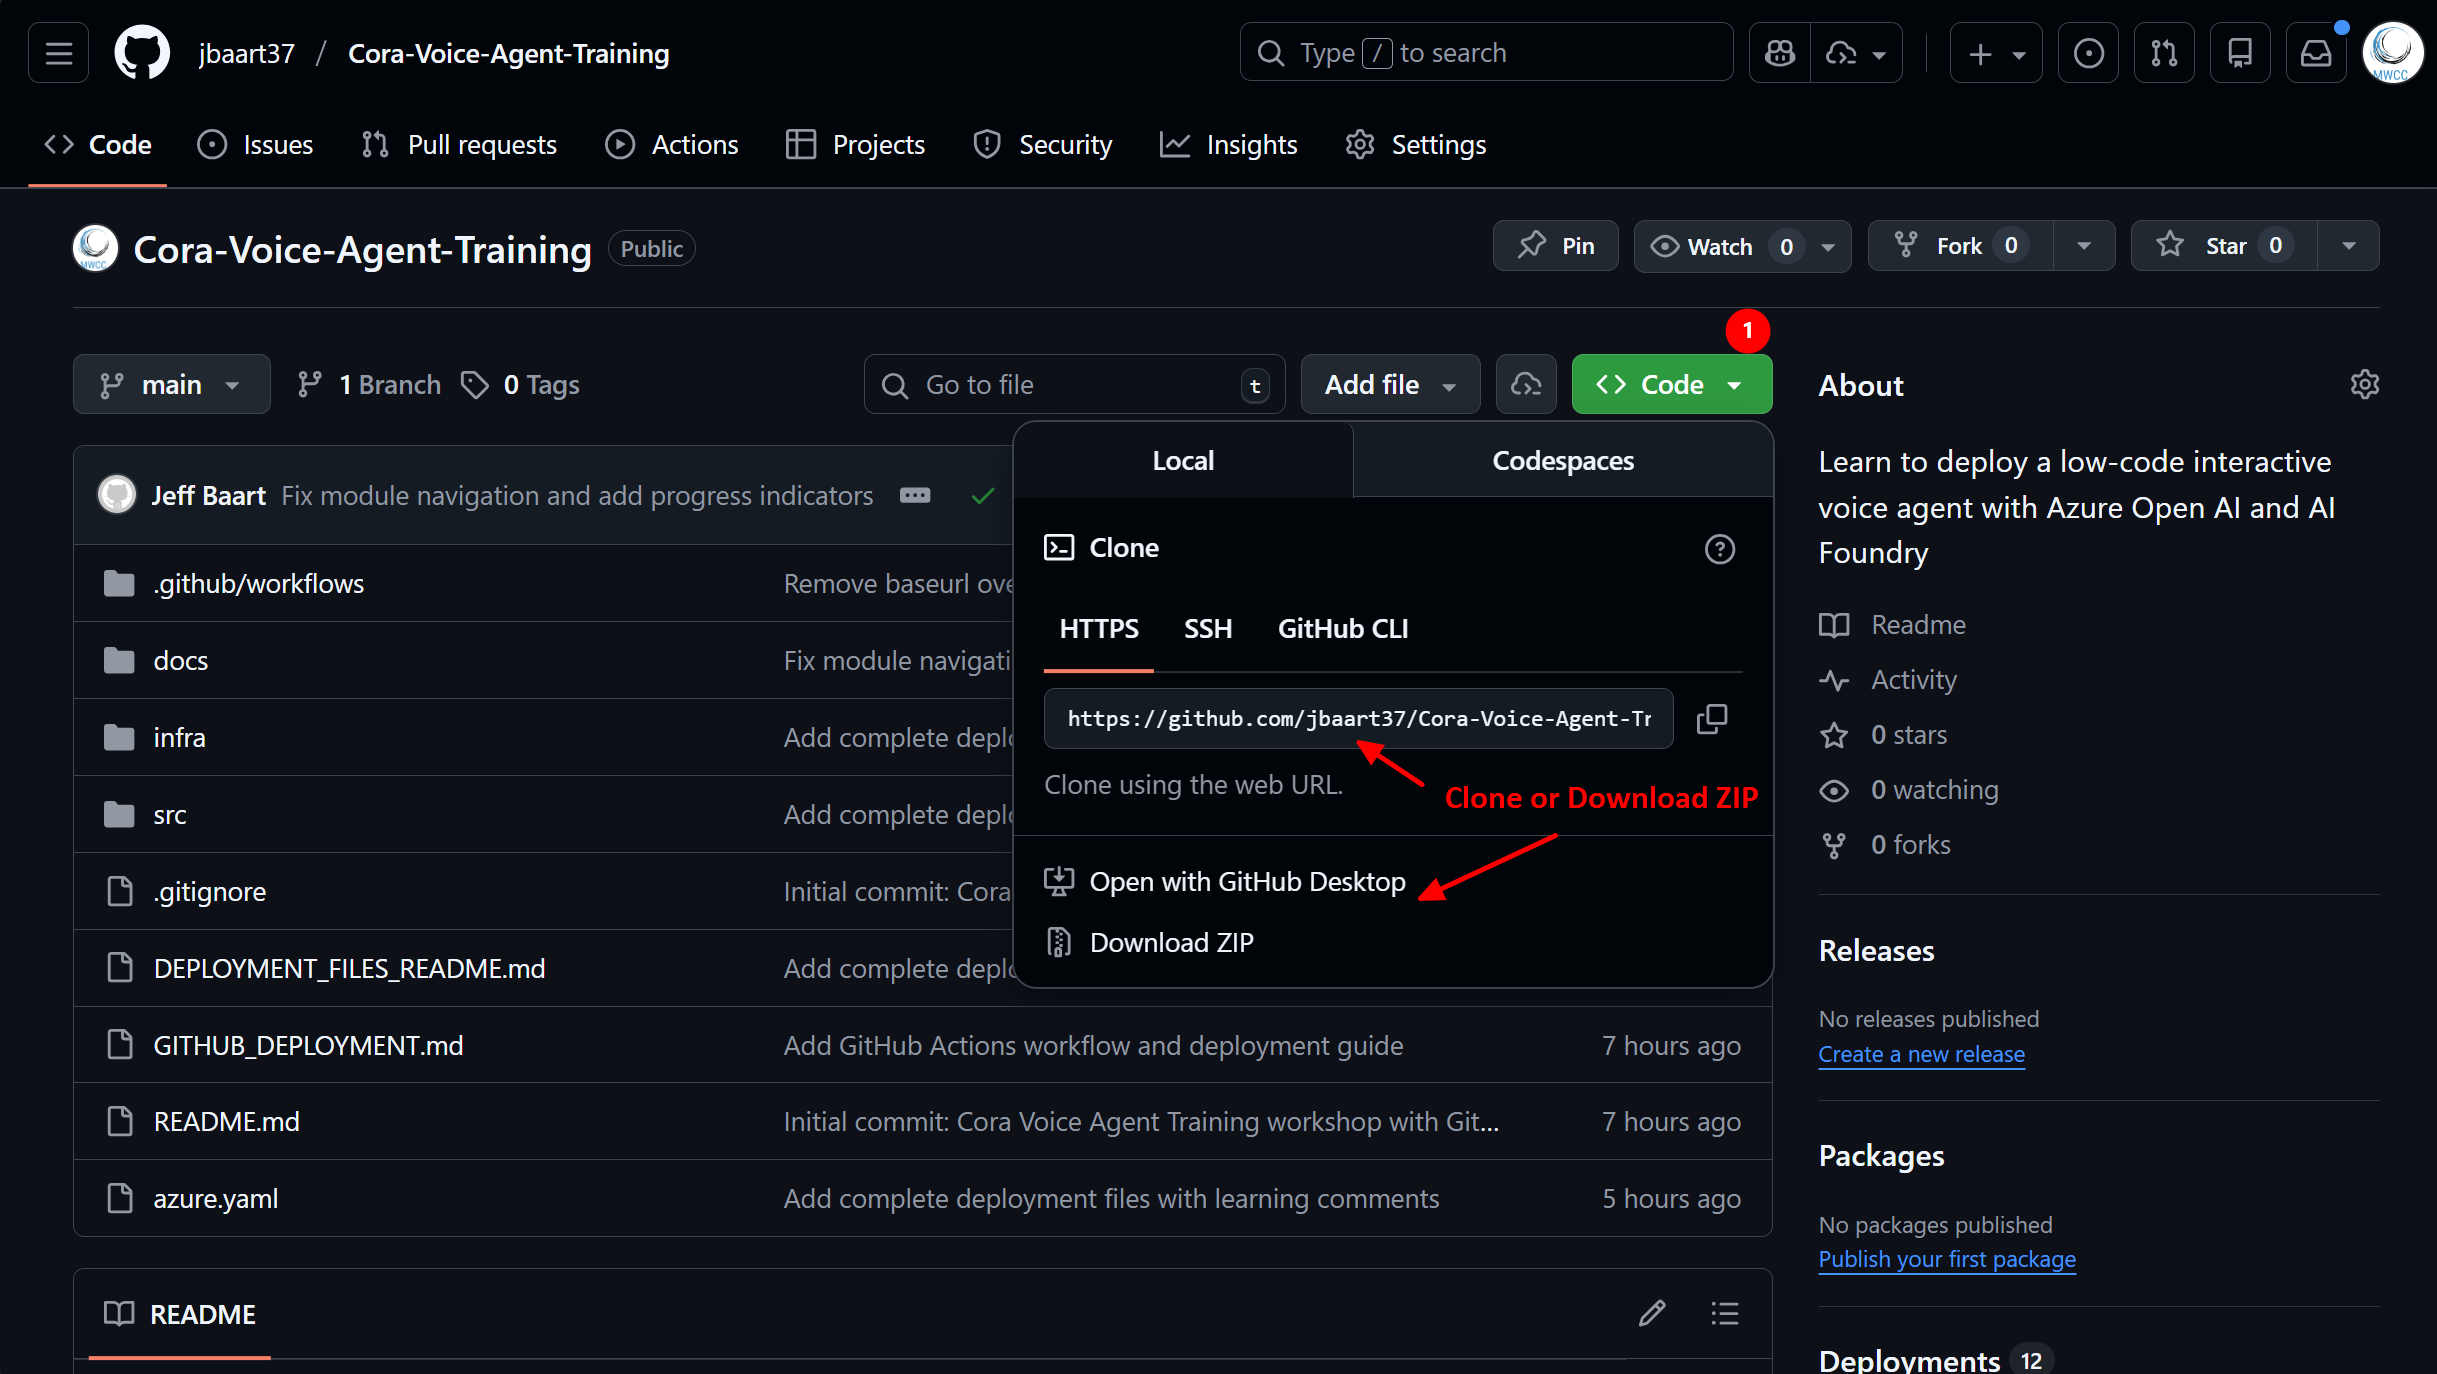
Click to enlarge
📂 Step 2: Understanding the Repository Structure
Once cloned, you’ll see this structure:
Once cloned, you’ll see this structure:
Cora-Voice-Agent-Training/
├── src/                        # 🐍 Application source code
│   ├── app.py                  # Flask web application
│   ├── agent.py                # Azure OpenAI agent logic
│   ├── storage_service.py      # Azure Table Storage
│   ├── config.py               # Configuration management
│   ├── requirements.txt        # Python dependencies
│   ├── Dockerfile              # Container image definition
│   ├── static/                 # CSS, JS, images
│   └── templates/              # HTML pages
│
├── infra/                      # ☁️ Infrastructure as Code (Bicep)
│   ├── main.bicep              # Main deployment template
│   ├── main.parameters.json    # Default parameters
│   └── core/                   # Modular components
│       ├── host/               # Container Apps, Registry
│       └── monitor/            # Logging, Application Insights
│
├── docs/                       # 📚 This training website
│   └── modules/                # Training modules you're reading now
│
├── azure.yaml                  # 🚀 Azure Developer CLI config
├── README.md                   # Repository overview
└── DEPLOYMENT_FILES_README.md  # Deployment guide
Key Files to Know
| File | Purpose | You’ll Need This For |
|---|---|---|
azure.yaml |
Tells Azure Developer CLI how to deploy | Module 2 deployment |
infra/main.bicep |
Defines all Azure resources to create | Understanding what gets deployed |
src/config.py |
Application configuration | Understanding environment variables |
src/README.md |
Developer documentation | Reference during troubleshooting |
infra/README.md |
Infrastructure documentation | Deployment options & cost info |
📸 Screenshot placeholder: VS Code Explorer showing repository structure
🔐 Step 3: Azure CLI Setup
Before deploying, you need to authenticate with Azure.
Install Azure CLI (if not already installed)
Windows:
winget install -e --id Microsoft.AzureCLI
Mac:
brew install azure-cli
Linux:
curl -sL https://aka.ms/InstallAzureCLIDeb | sudo bash
Log In to Azure
az login
This will:
- Open your browser
- Prompt you to sign in with your Azure account
- Return to the terminal when complete
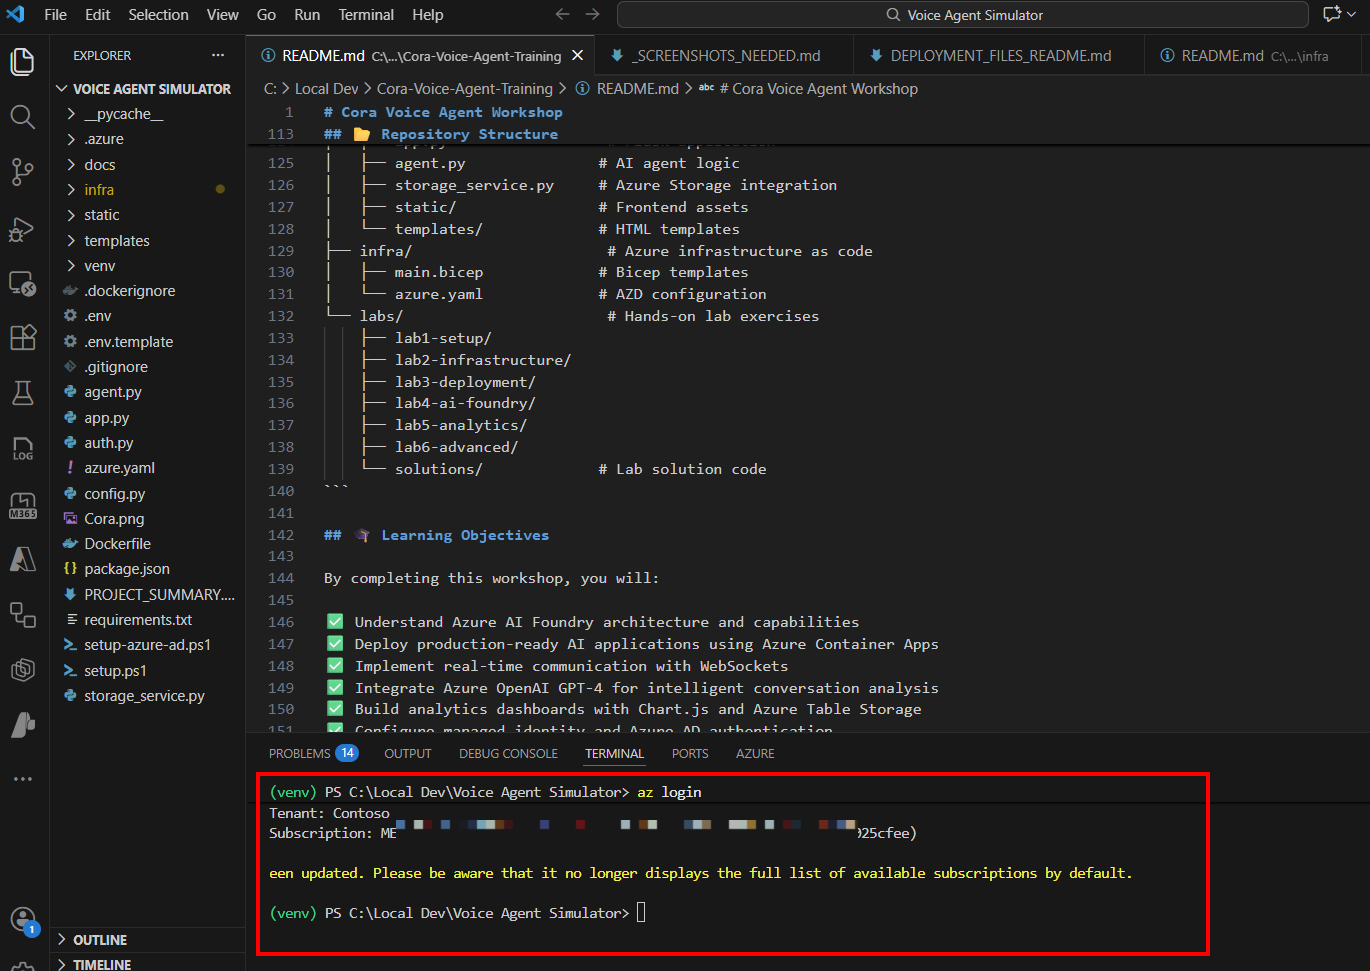
Click to enlarge
Verify Your Subscription
# List all subscriptions you have access to
az account list --output table

# Set the subscription you want to use (if you have multiple)
az account set --subscription "Your Subscription Name"

# Verify it's set correctly
az account show --output table
Important: Make note of your Subscription ID - you’ll need it later!
� Step 4: Create Your .env File (Recommended!)
Do this now so you can fill it in as you go through the next steps!
Why Resource Groups Matter
Think of a resource group as a folder for your Azure resources. Everything for this project should go in the same resource group:
✅ Benefits of keeping everything together:
- 🧹 Easy cleanup: Delete the resource group = delete everything (no orphaned resources!)
- 💰 Cost tracking: See total cost for the entire project in one place
- 🔐 Security management: Grant access to the whole project with one permission assignment
- 📊 Organization: All related resources grouped logically
Resource Group Naming
Recommended naming convention:
rg-cora-{environment}

Examples:
  rg-cora-dev      (for development)
  rg-cora-test     (for testing)
  rg-cora-prod     (for production)
Good news: When you run azd up in Module 2, it will automatically create the resource group for you! But it’s important to understand why we use this pattern.
Resources That Will Live Together
In Module 2, these will all be created in one resource group:
- Container Apps Environment
- Container App (your web application)
- Container Registry (stores Docker images)
- Storage Account (conversation scores)
- Log Analytics Workspace (logs)
- Application Insights (monitoring)
💡 Pro Tip: Some organizations have policies requiring separate resource groups for different resource types (compute vs storage vs networking). If your organization has such policies, discuss with your cloud governance team before deploying!
📝 Step 4: Create Your .env File
Do this now so you can fill it in as you go through the next steps!
Why create this file now?
- 📝 Document as you go - Fill in values while fresh in your mind
- 🔄 Easy redeployment - One file with everything you need
- 👥 Team reference - Share the template (without secrets!)
- 🧪 Local testing - Run the app locally later
Quick start: Copy the example file and edit it:
# Copy the example file to .env
copy .env.example .env

# Or on Mac/Linux:
cp .env.example .env
Then open .env and fill in your actual values. Here’s what the file contains:
# =================================================================
# CORA Voice Agent - Configuration Template
# =================================================================
# Fill in YOUR values as you complete the steps below
# This file is for local development and as reference
# =================================================================

# ─────────────────────────────────────────────────────────────────
# Step 3: Azure Account Information
# ─────────────────────────────────────────────────────────────────
# Your Azure subscription ID (from Step 3: az account show)
AZURE_SUBSCRIPTION_ID=

# Your preferred Azure region (we recommend eastus)
AZURE_LOCATION=eastus

# Your environment name - used by azd for tracking
# Keep it simple: dev, test, prod (or cora-dev, cora-test, etc.)
# This is NOT the resource group name, but they should align!
AZURE_ENV_NAME=dev

# ─────────────────────────────────────────────────────────────────
# Step 5: Resource Group Planning
# ─────────────────────────────────────────────────────────────────
# Your resource group name (will be created in Module 2)
# Should align with your environment name above
# Pattern: rg-cora-{AZURE_ENV_NAME}
# Example: if AZURE_ENV_NAME=dev, then use rg-cora-dev
RESOURCE_GROUP=rg-cora-dev

# ─────────────────────────────────────────────────────────────────
# Step 6: Azure AI Foundry Configuration
# ─────────────────────────────────────────────────────────────────
# Paste your Foundry endpoint URL here (from Step 6)
AZURE_AI_FOUNDRY_ENDPOINT=

# Your GPT model deployment name (from Step 6)
AZURE_AI_MODEL_NAME=gpt-4o

# Optional: API Key (only needed for local development)
# If deploying to Azure, Managed Identity is used automatically
# AZURE_AI_FOUNDRY_API_KEY=

# ─────────────────────────────────────────────────────────────────
# Auto-populated by azd (leave empty for now)
# ─────────────────────────────────────────────────────────────────
# APPLICATIONINSIGHTS_CONNECTION_STRING=
📋 How to Use This Template:
- Create the file now - Copy the template above into
.env - Fill in Step 3 values - Add your subscription ID from
az account show - Skip to Step 6 - Leave AI Foundry fields empty for now
- Come back and fill them - After creating your Foundry project in Step 6
⚠️ Security Notes:
- ✅
.envis in.gitignore(won’t be committed to Git) - ❌ Never share API keys in screenshots
- 🔒 Azure deployment uses Managed Identity (no API keys!)
- 💡 For team sharing, remove any API key values before sharing
📦 Step 5: Plan Your Resource Group
Critical Planning Step: Before creating any Azure resources, let’s plan where everything will live.
Why Resource Groups Matter
Think of a resource group as a folder for your Azure resources. Everything for this project should go in the same resource group:
✅ Benefits of keeping everything together:
- 🧹 Easy cleanup: Delete the resource group = delete everything (no orphaned resources!)
- 💰 Cost tracking: See total cost for the entire project in one place
- 🔐 Security management: Grant access to the whole project with one permission assignment
- 📊 Organization: All related resources grouped logically
Resource Group Naming
Recommended naming convention:
rg-cora-{environment}

Examples:
  AZURE_ENV_NAME=dev    →  RESOURCE_GROUP=rg-cora-dev
  AZURE_ENV_NAME=test   →  RESOURCE_GROUP=rg-cora-test
  AZURE_ENV_NAME=prod   →  RESOURCE_GROUP=rg-cora-prod
💡 Keep them aligned: Your AZURE_ENV_NAME and RESOURCE_GROUP should match conceptually:
- Environment name (
AZURE_ENV_NAME): Simple name for azd tracking (e.g.,dev,test) - Resource group (
RESOURCE_GROUP): Azure resource container following naming conventions (e.g.,rg-cora-dev)
Recommended pattern: Use dev for env name and rg-cora-dev for resource group.
💡 Fill this in: Go back to your .env file and make sure both values align:
AZURE_ENV_NAME=dev
RESOURCE_GROUP=rg-cora-dev
Good news: When you run azd up in Module 2, it will automatically create the resource group for you! But it’s important to understand why we use this pattern.
Resources That Will Live Together
In Module 2, these will all be created in one resource group:
- Container Apps Environment
- Container App (your web application)
- Container Registry (stores Docker images)
- Storage Account (conversation scores)
- Log Analytics Workspace (logs)
- Application Insights (monitoring)
💡 Pro Tip: Some organizations have policies requiring separate resource groups for different resource types (compute vs storage vs networking). If your organization has such policies, discuss with your cloud governance team before deploying!
🤖 Step 6: Azure AI Foundry Project Setup
You need an Azure AI Foundry project with a deployed GPT model.
Important: When creating your AI Foundry project, use the same resource group you planned in Step 5, or be ready to specify an existing one.
Option A: You Already Have a Project
If your organization provided a project, you need to get:
- Project Endpoint
- Format:
https://your-project.cognitiveservices.azure.com/ - Found in: Azure Portal → Your AI Foundry Project → Overview → Endpoint
- Format:
- Model Deployment Name
- The name you gave your GPT deployment (e.g.,
gpt-4o,gpt-4o-mini) - Found in: AI Foundry Studio → Deployments
- The name you gave your GPT deployment (e.g.,
Click to enlarge
Click to enlarge
Option B: Create a New Project
If you need to create your own AI Foundry project:
Portal Experience Note 🔄
Azure AI Foundry has two portal experiences:
- New Experience (default): Modern UI with updated navigation
- Legacy Experience: Classic UI with familiar layout
For this training: Our screenshots use the legacy experience for consistency. You can toggle between experiences using the switcher at the top of the portal.
💡 Pro Tip: Both experiences work identically - it’s just different layouts for the same functionality!
Step-by-Step Setup
- Navigate to Azure AI Foundry
- Go to Azure AI Foundry Studio
- Log in with your Azure credentials
- Create a New Project
- Click + New project (or + Create new project in new experience)
- You’ll see the project creation form
-
Fill in Project Details:
Field What to Enter Why This Matters Project name cora-voice-agentIdentifies your project in the portal Subscription Select your Azure subscription Where costs will be billed Resource group Select or create rg-cora-devCRITICAL: Use the same resource group for everything! Location East USorEast US 2Must support both AI and Container Apps AI Services Create new or use existing Creates the underlying OpenAI resource 🔍 Location tip: Stick with East US/East US 2 for best service availability!
- Configure Application Insights
- When prompted about Application Insights, select “Enable”
- This sets up telemetry collection for monitoring
- Why? In Module 6, we’ll use this for advanced observability and tracing
- Default settings are fine for now
- Click Create
- Azure provisions your AI Foundry project (~2-3 minutes)
- Wait for “Deployment succeeded” notification
-
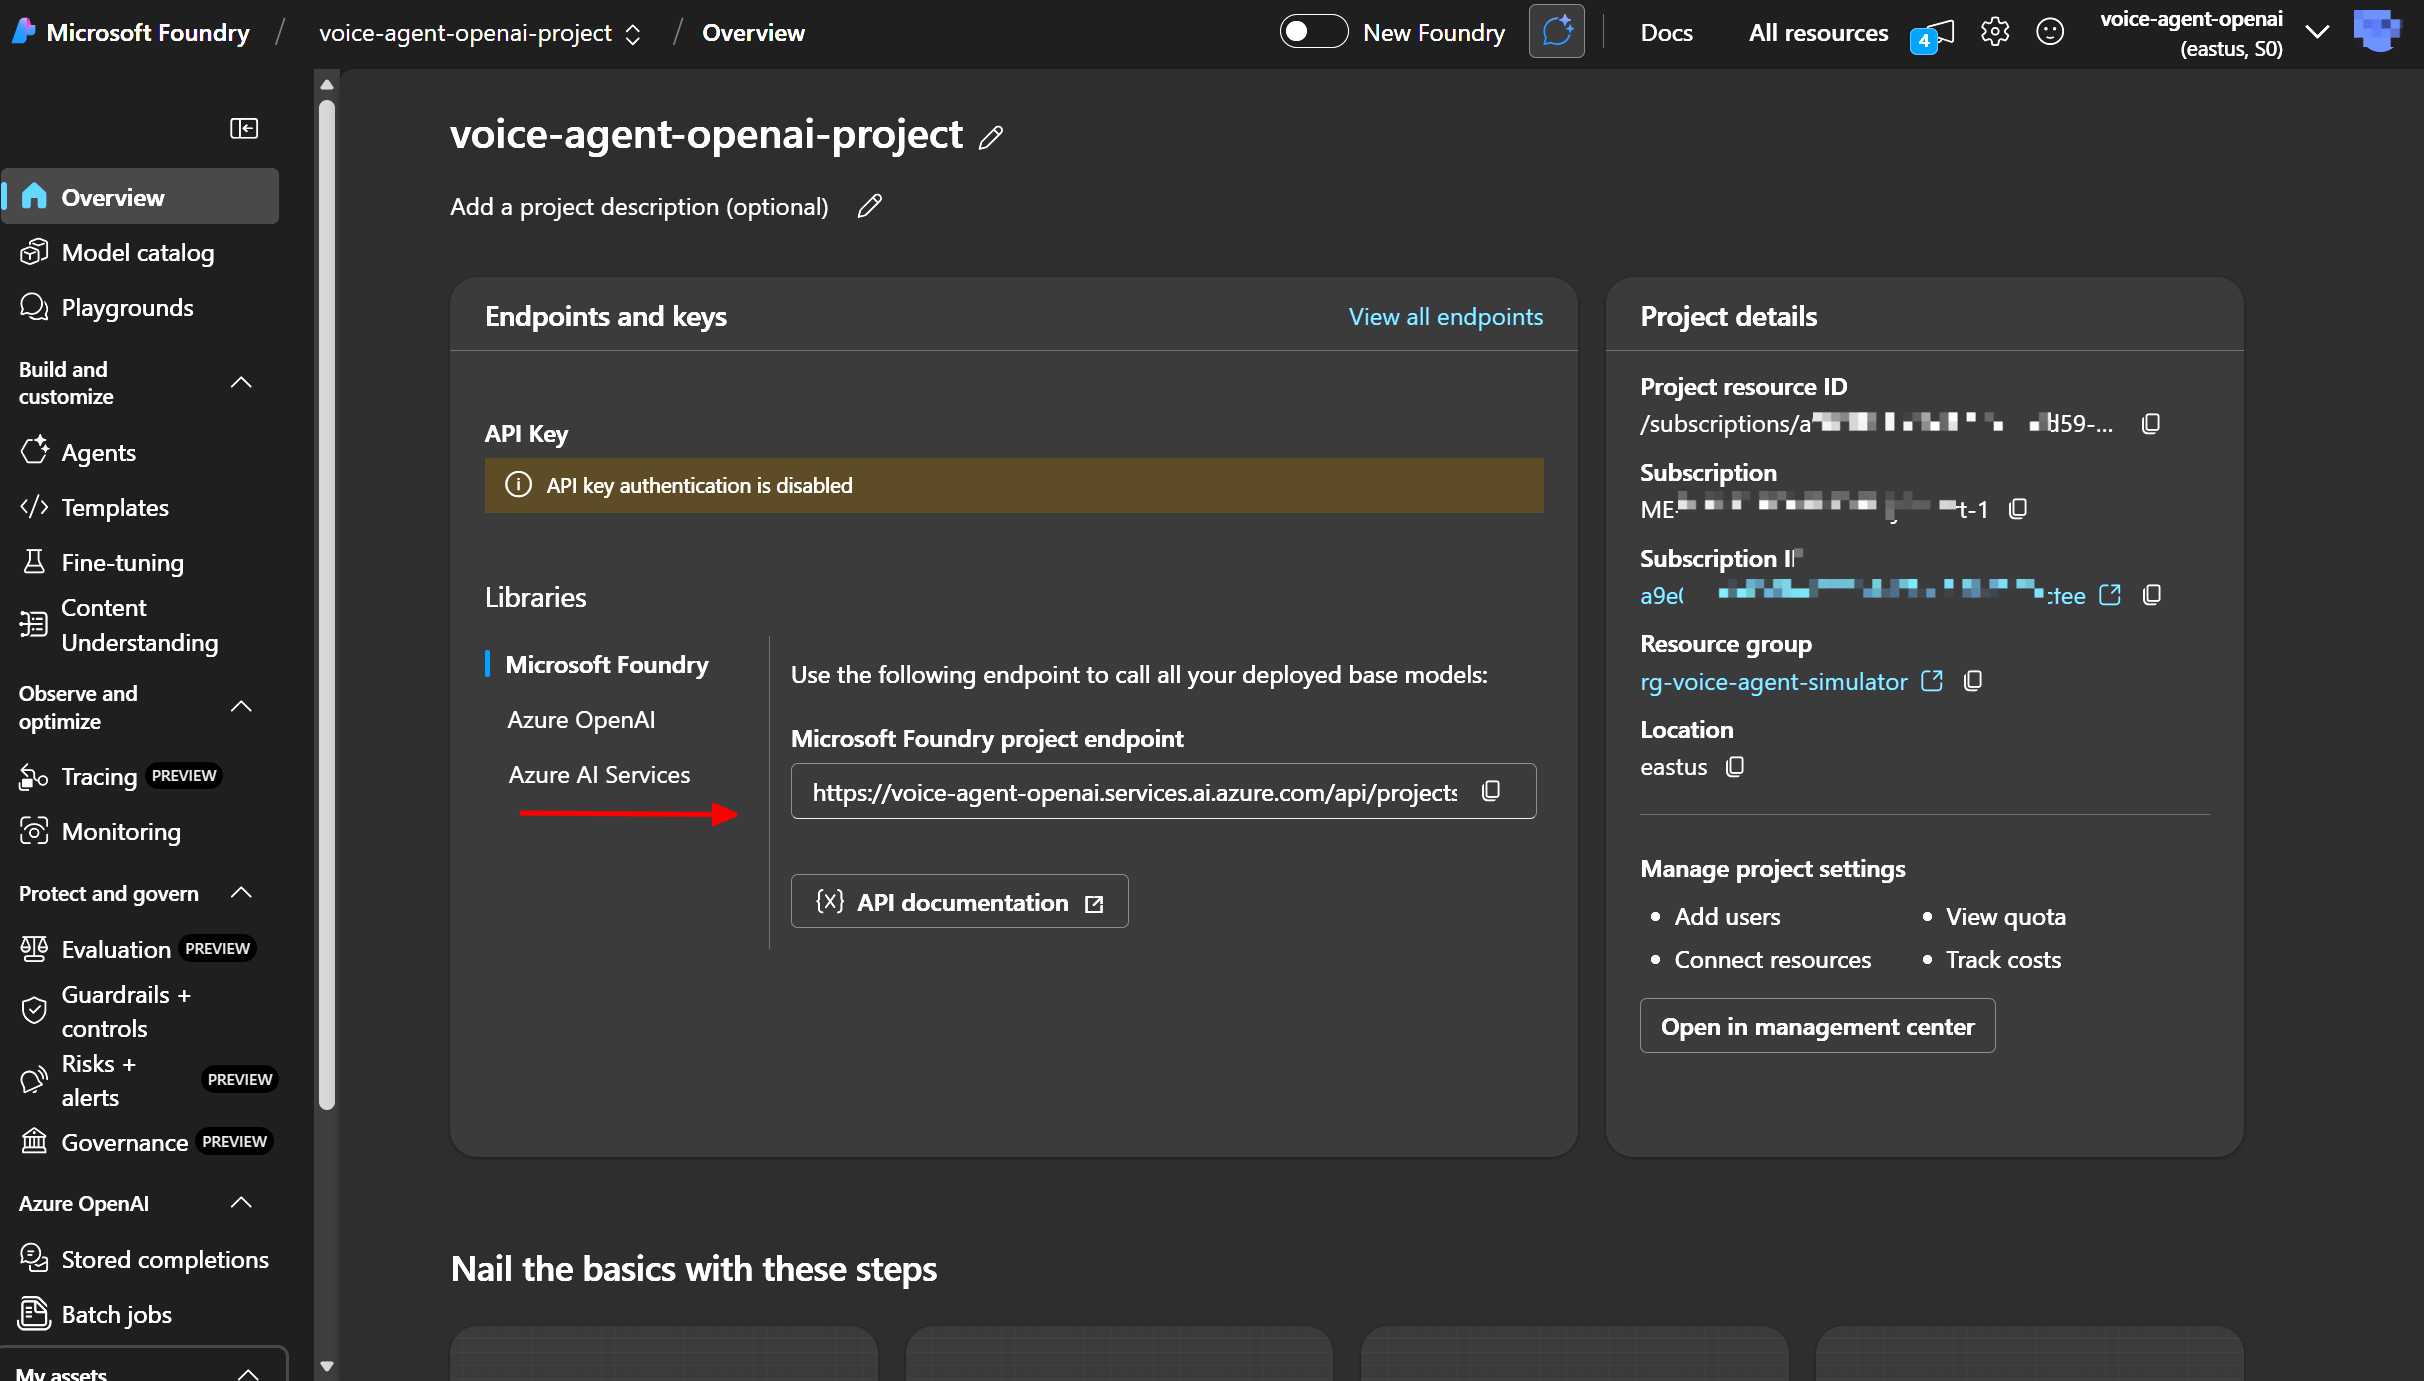
Copy Your Endpoint 📋
Critical step - add this to your .env file!
After project creation:
- Go to project Overview page
- Find the Endpoint field (format:
https://your-project.openai.azure.com/) - Copy this URL and paste it into your
.envfile asAZURE_AI_FOUNDRY_ENDPOINT
Click to enlarge
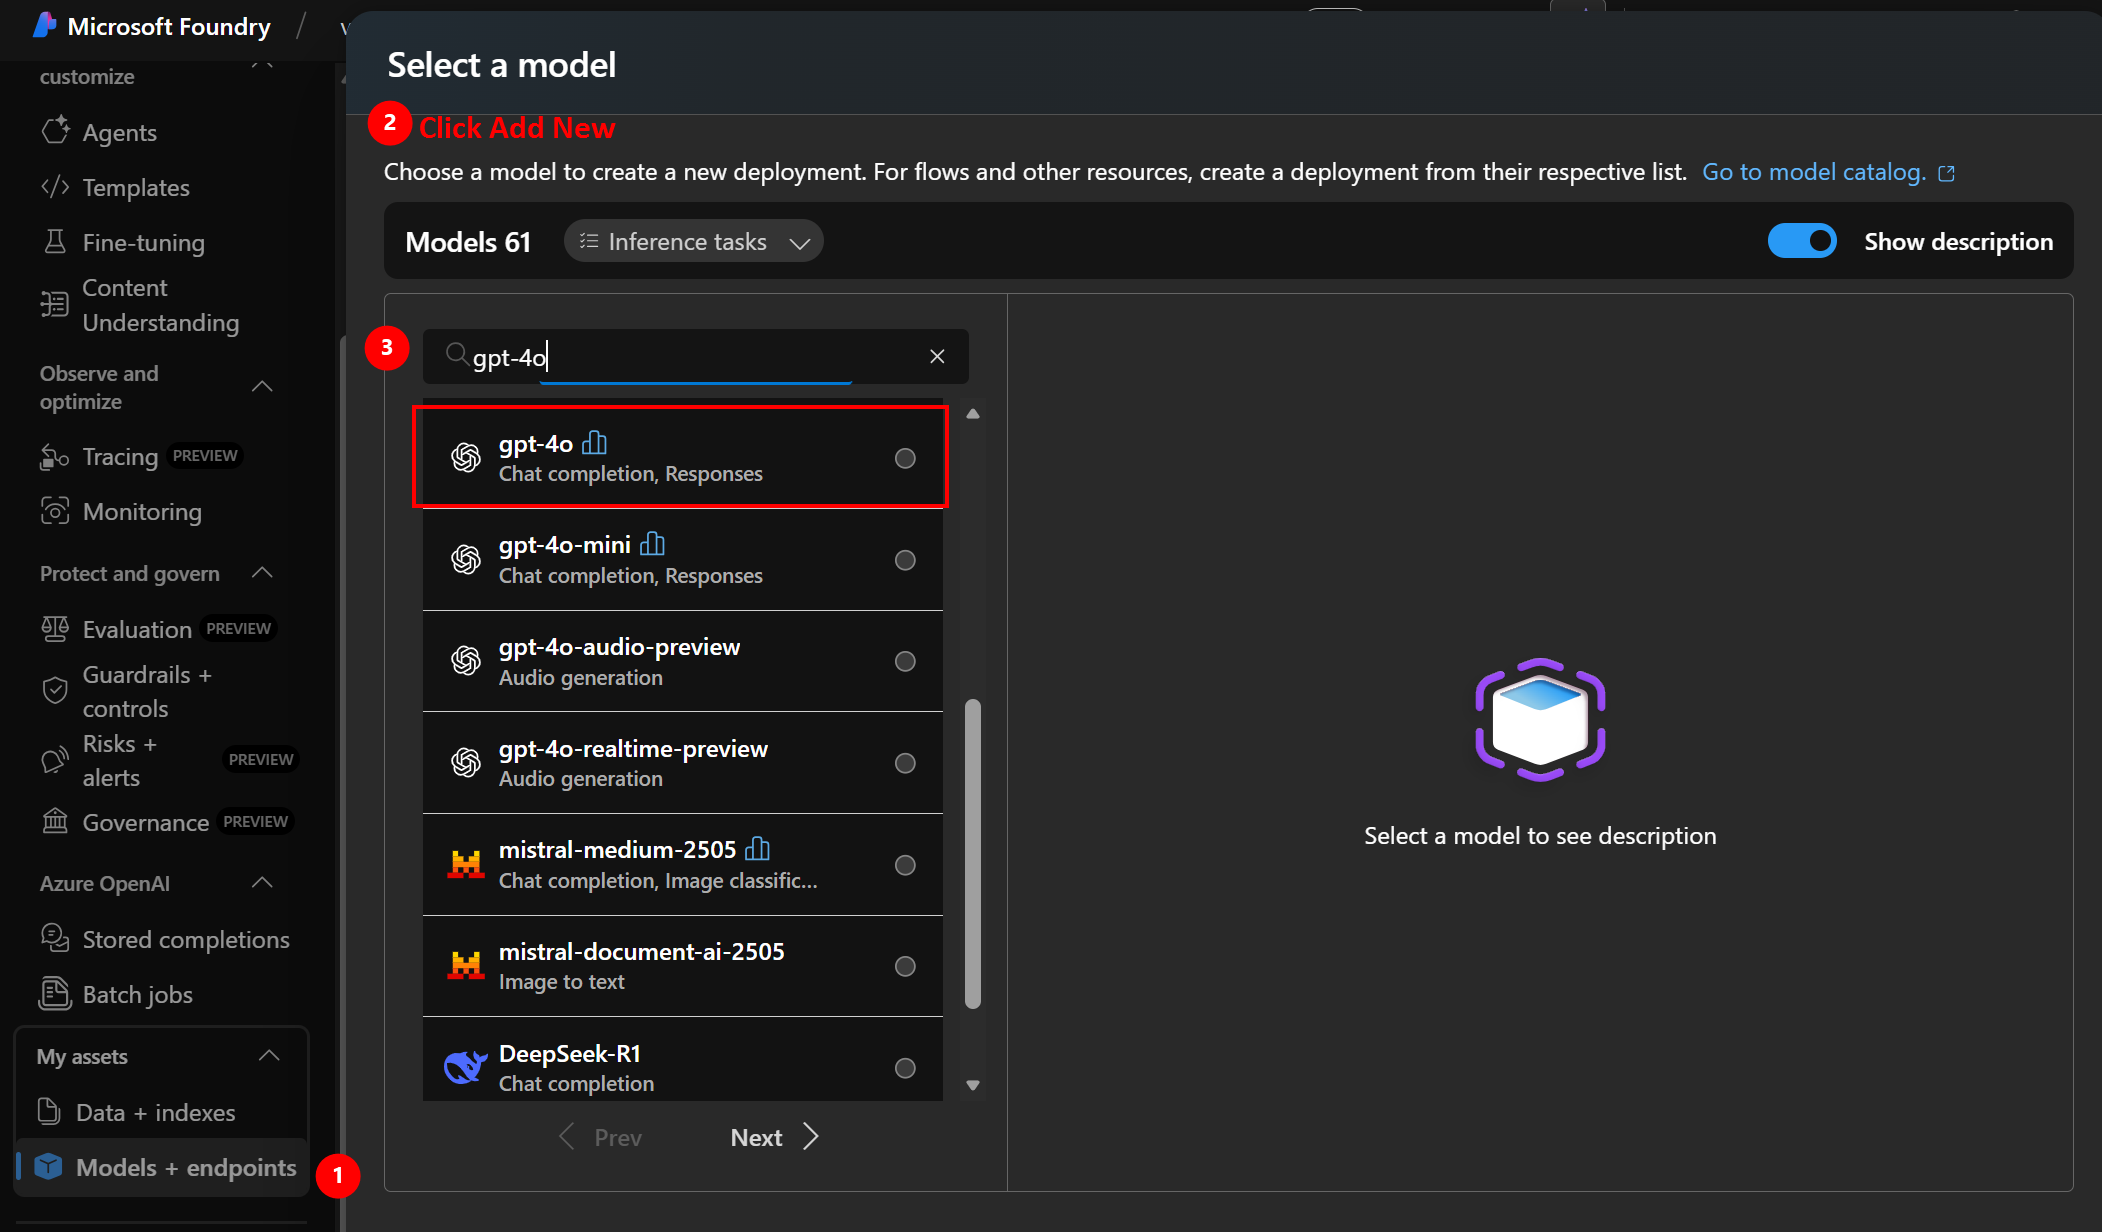
-
Deploy a GPT Model
- Navigate to Deployments (left sidebar)
- Click + Create deployment or + Deploy model
-
Configure deployment:
Setting Value Notes Model gpt-4oorgpt-4o-minigpt-4o-mini is cheaper for testing Deployment name gpt-4oKeep it simple - use model name Model version Latest Auto-updates to newest version Deployment type Standard Default option - Click Deploy
- Wait for deployment to complete (~1-2 minutes)
- Add the deployment name to your .env file as
AZURE_AI_MODEL_NAME
Click to enlarge
About API Keys 🔑
You’ll notice Azure AI Foundry provides API keys after deployment. You won’t need them for this training!
Why?
- We’re using Managed Identity for authentication (more secure)
- No keys to rotate, manage, or accidentally commit to Git
- Azure handles authentication automatically between services
When you would use API keys:
- Accessing the model from outside Azure (e.g., local development)
- Quick testing with REST API clients
- Legacy applications not using managed identity
⚠️ Security Best Practice: If you ever need to use API keys, always store them in Azure Key Vault, never in code or configuration files. Azure Key Vault provides secure storage, access control, and audit logging for secrets.
For CORA: Managed Identity handles everything automatically in Module 2! 🎉
Cost Note: GPT-4o charges per token. Budget approximately:
- Development/Testing: ~$5-20/month
- Production: Varies by usage
Token Cost Reference:
- gpt-4o: ~$5 per 1M input tokens, ~$15 per 1M output tokens
- gpt-4o-mini: ~$0.15 per 1M input tokens, ~$0.60 per 1M output tokens
💡 Cost Tip: Start with gpt-4o-mini for training - it’s 97% cheaper!
✅ Step 7: Verify You’re Ready
Before moving to Module 2 (deployment), confirm you have:
- ✅ Repository code on your local machine (Git clone or ZIP download)
- ✅ Azure CLI installed and logged in (
az loginsuccessful) - ✅ Subscription ID identified and added to
.env - ✅ Resource group naming pattern decided (e.g.,
rg-cora-dev) - ✅
.envfile created with Steps 3 and 5 completed - ✅ Azure AI Foundry project created with GPT model deployed
- ✅ AI Foundry endpoint URL added to
.envfile - ✅ Model deployment name added to
.envfile
🔮 What’s Next: Validation Across Modules
Don’t worry if you’re not 100% sure everything is correct! We’ll validate and explore your setup in detail throughout the training:
📦 Module 2: Infrastructure Validation
- Verify all Azure resources deployed correctly
- Check Container Apps, Storage, Registry, Log Analytics
- Confirm resource group organization
- Test endpoint URLs
🚀 Module 3: Application Validation
- Test the deployed web application
- Verify conversation functionality
- Confirm voice features work
- Check analytics dashboard
🧠 Module 4: AI Foundry & Model Validation
- Deep dive into your Foundry project
- Test model responses in Playground
- Verify conversation scoring
- Explore OpenTelemetry traces
- Confirm cost and performance metrics
💡 Bottom Line: If something isn’t quite right in Module 1, we’ll catch it and fix it in the upcoming modules. Each module builds on and validates the previous work!
🏗️ What You’ll Deploy in Module 2
Now that you’re set up, here’s what will be created when you deploy:
Azure Resources
| Resource | Purpose | Estimated Cost | Why This? |
|---|---|---|---|
| Container Apps Environment | Hosting platform for your web app | ~$10/month | 🎯 Scales to $0 when idle! |
| Container App | Runs your voice agent application | Included | 💪 WebSocket-ready |
| Container Registry | Stores your Docker images | ~$5/month | 📦 Private & secure |
| Storage Account | Stores conversation scores | <$1/month | 💰 Cheapest option |
| Log Analytics Workspace | Collects logs and metrics | ~$3/month | 🔍 First 5GB free |
| Application Insights | Monitoring and telemetry | Free | 📊 Because blind deployments are scary |
Total Estimated Cost: ~$18-25/month for development environment
💡 Pro Tip: The Container App can scale to zero when idle = Netflix money saved! 🎬
🎭 Architectural Story Time: Why These Choices?
Or: “How to sound smart in architecture review meetings”
Let’s talk about why we made specific technology choices. Spoiler alert: It’s not just because they’re shiny and new. 🌟
🥊 The Great Platform Battle: Container Apps vs The World
The Contenders:
- 🏃 Azure Container Apps (Our Champion!)
- 🦸 Azure App Service (The Reliable Veteran)
- ⚡ Azure Functions (The Speed Demon)
- 🚢 Azure Kubernetes Service (The “I Have a Team of DevOps Engineers”)
- 🎨 Low-code (The “My Boss Saw This Demo”)
The Ultimate Showdown:
| Feature | Container Apps | App Service | Functions | AKS | Low-Code |
|---|---|---|---|---|---|
| WebSocket Support | ✅ Perfect | ✅ Works | ❌ “That’s not my job” | ✅ Yes | ❌ Nope |
| Scale to Zero | ✅ $0 when idle! | ❌ Always hungry | ✅ Yes | ❌ Always running | ✅ Varies |
| Setup Complexity | ✅ Easy | ✅ Easy | ✅ Easy | ❌ PhD required | ✅ Point & click |
| Control Level | ✅ Full control | ✅ Full control | ⚠️ Stateless life | ✅ EVERYTHING | ❌ “You can’t do that” |
| Monthly Cost (idle) | $0 🎉 | ~$50 💸 | $0 | ~$200 💀 | ~$5-20 |
Why Container Apps Wins This Round:
🎯 Reason #1: WebSockets Are Not Negotiable
Customer: "I want to talk to the AI in real-time!"
Functions: "Best I can do is check back every 5 seconds."
Container Apps: "Let's have a conversation!"
💰 Reason #2: The CFO Will Love You
Traditional App Service:
  Monday-Friday: Running ($$$)
  Weekend: Still running ($$$ for nothing!)
  Your vacation: Still running ($$$ while you're at the beach!)

Container Apps:
  In use: Running ($$$)
  Idle: Asleep ($0 - literally zero!)
  Your boss: 😊
🎓 Reason #3: Production Path Is Smooth
- Same platform from dev → test → prod
- No “works on my machine” surprises
- No re-architecture needed when traffic grows
- Your future self will thank you 🙏
When to Pick the Alternatives:
🦸 App Service - When:
- Your team already manages 50 App Services
- “If it ain’t broke…” is your company motto
- You like paying for compute you’re not using (we don’t judge)
⚡ Functions - When:
- You’re building a “process this file” app
- Stateless is your love language
- You enjoy debugging cold starts
🚢 AKS - When:
- You have a Kubernetes expert on speed dial
- Your architecture diagram looks like a city map
- You enjoy YAML files (lots of them)
🎨 Low-Code - When:
- Your app is basically a fancy form
- “Can you make this button blue?” is your biggest challenge
- Real-time features are not on the menu
🏗️ Infrastructure as Code: Because Clicking is for Chumps
The Eternal Debate:
- 👆 Click through Azure Portal (The Manual Labor Approach)
- 📝 Write Bicep templates (The Smart Person’s Move)
Let’s Do Some Math:
Scenario: Deploy to 3 environments (Dev, Test, Prod)

Manual Clicking Method:
  ⏱️  First environment: 45 minutes of clicking
  ⏱️  Second environment: 45 minutes (click... click... click...)
  ⏱️  Third environment: 45 minutes (are we done yet?)
  ⏱️  Fix a typo in all three: 1 hour (oops, which button was it?)
  ⏱️  Disaster recovery: Half a day (what did we click again?)
  🎯  Total: 3.5 hours + anxiety
  😓  Risk of RSI: High

Bicep IaC Method:
  ⏱️  Write template once: 30 minutes
  ⏱️  Deploy all three: 15 minutes (azd up × 3)
  ⏱️  Fix typo everywhere: 2 minutes (change 1 line, redeploy)
  ⏱️  Disaster recovery: 5 minutes (azd up again)
  🎯  Total: 52 minutes + confidence
  😎  Risk of RSI: Low (more time for coffee)
But Wait, There’s More!
📚 Version Control:
Portal Clicking:
  Boss: "What changed last Tuesday?"
  You: "Uh... I think I clicked... something?"

Bicep with Git:
  Boss: "What changed last Tuesday?"
  You: "Here's the exact commit with explanation and code review."
  Boss: *promotes you*
🔒 Security & Compliance:
Portal Clicking:
  Auditor: "Show me your infrastructure configuration."
  You: *takes 50 screenshots*

Bicep Templates:
  Auditor: "Show me your infrastructure configuration."
  You: "Here's the repo. Everything's documented, versioned, and reviewed."
  Auditor: *smiles* (they never smile!)
💰 Cost Control:
Portal Clicking:
  Finance: "Why did our Azure bill double?"
  You: "Someone probably clicked Premium instead of Basic?"

Bicep Templates:
  Finance: "Why did our Azure bill double?"
  You: "Impossible. It's in the code. Line 42. Someone would need to commit a change."
  (Spoiler: It was Kevin. It's always Kevin.)
🚀 Azure Developer CLI: The “Deploy” Button We Always Wanted
The Old Way:
# Step 1: Create resource group
az group create --name rg-cora-dev --location eastus

# Step 2: Deploy infrastructure
az deployment group create --resource-group rg-cora-dev --template-file infra/main.bicep --parameters @parameters.json

# Step 3: Build container
az acr build --registry myregistry --image app:v1 src/

# Step 4: Update container app
az containerapp update --name myapp --resource-group rg-cora-dev --image myregistry.azurecr.io/app:v1

# Steps 5-15: More commands...
# Step 16: Realize you forgot something
# Step 17: Start over
# Step 18: Question career choices
The azd Way:
azd up
That’s it. Seriously. ✨
What Just Happened?
- ✅ Created resource groups
- ✅ Deployed all infrastructure
- ✅ Built Docker images
- ✅ Pushed to registry
- ✅ Deployed application
- ✅ Configured environment variables
- ✅ Secured secrets
- ✅ Gave you deployment URLs
- ✅ Made you look good in standup
For Your Team:
Junior Dev: "How do I deploy to test?"
You: "azd env select test && azd up"
Junior Dev: "That's it?"
You: "That's it."
Junior Dev: *mind blown* 🤯

Senior Architect: "What about the database connection?"
You: "In the Bicep template. Auto-configured."
Architect: *nods approvingly*

Manager: "Can we replicate this for other projects?"
You: "Already did. Same pattern."
Manager: "Promotion time."
🔐 Managed Identity: The “Delete All Your Secrets” Strategy
The Debate:
- 🔑 API Keys (The Traditional “Please Don’t Leak This” Method)
- 🎭 Managed Identity (The “We Live in the Future” Method)
Comparison Time:
API Key Approach:
  Step 1: Generate API key
  Step 2: Store in Key Vault
  Step 3: Grant app access to Key Vault
  Step 4: App reads key from Key Vault
  Step 5: App uses key to call service
  Step 6: Rotate key every 90 days
  Step 7: Update Key Vault
  Step 8: Restart apps
  Step 9: Get paged at 2 AM because rotation broke prod
  Step 10: Reconsider life choices

Managed Identity Approach:
  Step 1: Enable managed identity (checkbox)
  Step 2: Grant identity access to service (one command)
  Step 3: Done!
  Step 4-10: Go home on time
The Real Kicker:
🔓 When Someone Says “The Key Leaked”:
API Key Scenario:
  Security Team: "The key is in a GitHub commit from 3 months ago!"
  You: *panic*
  You: *revoke key*
  You: *generate new key*
  You: *update Key Vault*
  You: *restart all services*
  You: *update documentation*
  You: *send postmortem*
  You: *update resume*

Managed Identity Scenario:
  Security Team: "The key is in... wait, there is no key."
  You: *sips coffee peacefully* ☕
💰 The Math:
API Key Management (Annual):
  Key Vault: $0.03 per 10K operations = ~$200/year
  Staff Time: 4 hours/quarter rotating keys = ~$5,000/year
  Incident Response: 1 leaked key/year = ~$10,000/year
  Total: ~$15,200/year

Managed Identity:
  Azure AD: FREE
  Staff Time: 0 hours
  Incident Response: Can't leak what doesn't exist
  Total: $0/year
  Savings: ~$15,200/year (that's a nice conference budget!)
🎯 Why This Architecture Scales (Without Breaking Your Budget)
The Secret Sauce: We designed this like a LEGO set, not a monolith.
The Old Way (Monolith):
Everything in one big app:
  Problem: Need to scale AI processing?
  Solution: Scale EVERYTHING (including the HTML)
  Result: Paying for CPU to serve static images 🤦
The Smart Way (This Solution):
┌─────────────┐
│  Frontend   │ ← Scales independently (or move to CDN for pennies)
└─────────────┘
       ↓
┌─────────────┐
│  API Layer  │ ← Scales 1-100 instances based on traffic
└─────────────┘
       ↓
┌─────────────┐
│  AI Layer   │ ← Microsoft scales this (not your problem!)
└─────────────┘
       ↓
┌─────────────┐
│  Storage    │ ← Infinite scale (seriously, try to break it)
└─────────────┘
Real Talk Example:
Black Friday Traffic Spike:

Monolith:
  9 AM: 10 users → 1 server ($50/day)
  10 AM: 100 users → "Server melting..." → Emergency scale → 5 servers ($250/day)
  11 AM: 1000 users → "EVERYTHING IS ON FIRE" → 20 servers ($1,000/day)
  12 PM: Traffic drops → Still running 20 servers → Still paying $1,000/day
  Next Day: Manually scale down → Pray you got it right

Container Apps (This Solution):
  9 AM: 10 users → Scales up → $5/day
  10 AM: 100 users → Scales up more → $15/day
  11 AM: 1000 users → Auto-scales to 20 instances → $50/day
  12 PM: Traffic drops → Auto-scales down → $10/day
  Next Day: Already at right size → $5/day
  You: *sleeping peacefully*
🎨 Code vs Low-Code: The Honest Conversation
When Your Manager Says: “Why can’t we just use [Low-Code Platform]?”
Here’s your diplomatic response (backed by facts):
Low-Code is GREAT for:
- ✅ “I need a form to collect vacation requests”
- ✅ “Can you connect Excel to SharePoint?”
- ✅ “The marketing team needs a simple dashboard”
- ✅ “We need this by Friday” (and it’s really simple)
Code is NECESSARY for:
- ✅ “I need real-time bidirectional communication” (this app!)
- ✅ “We need custom AI logic”
- ✅ “Performance is critical”
- ✅ “We’re expecting 10,000+ concurrent users”
- ✅ “We need to integrate with 7 different APIs, 3 databases, and a carrier pigeon”
The Real Comparison:
| Question | Low-Code Answer | Code Answer |
|---|---|---|
| “Can it do WebSockets?” | “What’s a WebSocket?” | “Yes, and here’s the code.” |
| “Can it scale to 100K users?” | “Have you tried… fewer users?” | “Yes, and here’s the load test.” |
| “Can we customize the AI logic?” | “You get what you get.” | “Make it however you want.” |
| “What if we need to migrate?” | “You’re locked in, baby!” | “Export and go.” |
| “Can my nephew maintain this?” | “Maybe!” | “If they know Python, yes.” |
The Hybrid Approach (Best of Both Worlds):
Smart companies use BOTH:
Low-Code Frontend (Power Apps):
  "Submit a training request"
      ↓ calls API
Code Backend (This Solution):
  Complex AI + Real-time chat + Analytics
      ↓ stores data
Low-Code Dashboard (Power BI):
  "Look at pretty charts"
Everyone wins! 🎉
📚 Understanding Azure AI Foundry
Now that we’ve had fun with architecture, let’s get serious for a moment…
What is Azure AI Foundry?
Azure AI Foundry (formerly Azure AI Studio) is Microsoft’s unified platform for:
- Building and deploying AI applications
- Managing AI models and deployments
- Orchestrating agents and multi-agent workflows
- Evaluating AI performance
- Implementing responsible AI practices
How is it Different from Azure OpenAI?
| Azure OpenAI Service | Azure AI Foundry |
|---|---|
| Just the GPT API | Complete AI development platform |
| Single model calls | Agents, orchestration, evaluation |
| Basic deployment | Full lifecycle management |
| Limited tooling | Integrated development environment |
Think of it this way:
- Azure OpenAI = Just the GPT engine
- Azure AI Foundry = The full development studio + engine + tools
🎯 Real-World Use Cases
1. Customer Service Training
- New hire onboarding
- Skills refreshers for experienced agents
- Testing new scripts or procedures
- Performance benchmarking
2. Quality Assurance
- Evaluate agent performance objectively
- Identify training gaps
- Compare agent effectiveness
- Monitor improvement trends
3. Scenario Testing
- Test edge cases (angry customers, complex issues)
- Practice difficult conversations safely
- Experiment with different approaches
- Build confidence before real interactions
🎬 Demo: What You’ll Build
📸 Screenshot/GIF placeholder: Animated demo of the completed application
- Landing page with authentication
- Conversation interface with voice/text options
- Mood selector (happy, frustrated, curious, etc.)
- Live chat interaction
- Analytics dashboard with charts
Key Features:
- 🎤 Voice or Text Input (voice on desktop browsers only)
- 💬 Real-time Conversation via WebSockets
- 🎭 Mood-based Scenarios (6 different customer personalities)
- 📊 Performance Analytics (5-point scoring across 5 criteria)
- 🔐 Azure AD Authentication (Easy Auth integration)
- 📈 Progress Tracking (historical scores with charts)
🔗 Resources
Azure Documentation
Code References
- src/README.md - Application documentation
- infra/README.md - Infrastructure guide
- GitHub Repository
Learning Resources
❓ Troubleshooting
“az login” fails
Problem: Browser doesn’t open or authentication fails
Solutions:
- Try
az login --use-device-codefor manual code entry - Check if your organization requires VPN
- Verify you have an Azure account with active subscription
- Clear browser cache and try again
Can’t find Azure AI Foundry endpoint
Problem: Not sure where to get the endpoint URL
Solutions:
- Go to Azure Portal
- Search for your AI Foundry project name
- Click on the resource
- Look for “Endpoint” in the Overview or Keys and Endpoint section
- Should look like:
https://<project-name>.cognitiveservices.azure.com/
Repository clone fails
Problem: Git clone command doesn’t work
Solutions:
- Install Git: https://git-scm.com/downloads
- Check your internet connection
- Try downloading as ZIP from GitHub (Code → Download ZIP)
📝 Knowledge Check
Before moving to Module 2, test your understanding:
- What are the three main folders in the repository?
Click to reveal answer
src/(application code)infra/(Azure infrastructure templates)docs/(training website)
</details>
- What information do you need from Azure AI Foundry?
Click to reveal answer
- Project endpoint URL
- Model deployment name (e.g., gpt-4o-deployment)
</details>
- What tool will you use to deploy in Module 2?
Click to reveal answer
Azure Developer CLI (azd) - What does CORA stand for?
Click to reveal answer
Customer-Oriented Response Agent - and it's the name of OUR application, not an industry acronym!
🎓 Summary
In this module, you:
- ✅ Cloned the training repository
- ✅ Understood the code structure (src/, infra/, docs/)
- ✅ Logged in to Azure CLI
- ✅ Identified your AI Foundry project endpoint
- ✅ Prepared for deployment
Next up: Module 2 will walk you through deploying everything to Azure with a single command: azd up